Building your own theremin is not only a thrilling endeavor but also a gateway to understanding the magic of electronic music. Invented by the pioneering Russian scientist Lev Theremin in the 1920s, the theremin stands as one of the earliest electronic musical instruments.
In this comprehensive guide, we will walk you through How to Build a Theremin from Scratch, the step-by-step process of constructing your very own theremin, offering insights, tips, and resources along the way.
We will walk you through the entire process, from selecting the parts to soldering them together.
By the end of this tutorial, you will have a working theremin that you can play around with!
- What Is Theremin?
- Why Build a Theremin?
- Step-by-Step Guide: How to Build a Theremin from Scratch
- Conclusion: How to Build a Theremin
- Frequently Ask Questions
- How much does it cost to build a theremin?
- Is building a theremin difficult?
- Can I customize my theremin with different components or features?
- What type of enclosure should I use for my theremin?
- How does the theremin work?
- What type of audio amplifier should I use for my theremin?
- Can I use a different type of speaker for my theremin?
- Can I add effects to my theremin?
What Is Theremin?
Theremin is one of the earliest electronic musical instruments, and it is also one of the easiest to build. It was invented by Russian scientist Lev Theremin in the 1920s.
The theremin uses two metal rods called antennas to sense the position of your hands in relation to the instrument. It then produces a sound that is based on the position of your hands.
Why Build a Theremin?
Before we delve into the construction process, let’s explore why building a theremin is a rewarding venture:
- Educational Value: Building a theremin provides a hands-on opportunity to grasp the fundamentals of electronic circuits and sound generation, making it an enriching educational experience.
- Creative Expression: Aspiring musicians and electronic enthusiasts can unleash their creativity by crafting their own instrument and exploring its sonic possibilities.
- Unique Performance Element: Incorporating a theremin into your musical repertoire adds a distinctive and captivating element to your performances, setting you apart from the crowd.
Step-by-Step Guide: How to Build a Theremin from Scratch
Step 1: Gathering Your Components
Before embarking on your theremin-building journey, ensure you have the following components:
- Enclosure: Select a suitable enclosure, such as a project box, to house your theremin circuitry. Consider factors like size, material, and accessibility for future modifications.
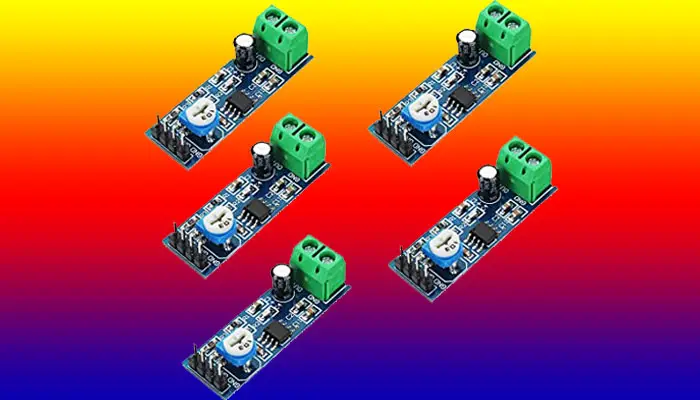
- Audio Amplifier Chip: Choose an appropriate audio amplifier chip, such as the popular LM386 audio amplifier, capable of amplifying the signal generated by the theremin circuit to drive the speaker effectively.
- Speaker: Opt for a speaker with sufficient power handling capacity (0.25W or higher) to accurately reproduce the theremin’s audio output, ensuring clarity and fidelity in sound reproduction.
- Antennas: Procure two metal rods or antennas, which serve as the primary interface for controlling the theremin’s pitch and volume. Consider materials like copper or aluminum for optimal conductivity and sensitivity.
- Passive Components: Gather capacitors, resistors, and other passive electronic components as per the schematic diagram. Pay attention to their values and ratings to ensure compatibility and proper functioning within the theremin circuit.
- Printed Circuit Board (PCB): Acquire a PCB to mount and interconnect the components securely, facilitating efficient assembly and minimizing the risk of electrical shorts or connection errors.
Step 2: Understanding the Schematic
Familiarize yourself with the schematic diagram of the theremin circuit, which illustrates the connections and functions of each component. Key components include:
- LM386 Audio Amplifier Chip: The LM386 serves as the heart of the theremin circuit, amplifying the weak audio signal generated by the antennas to a level suitable for driving the speaker.
- Antennas: Positioned at strategic locations on the schematic, the antennas detect the proximity of your hands and translate their movements into changes in pitch and volume, forming the core interaction mechanism of the theremin.
- Passive Components: Capacitors, resistors, and other passive components play critical roles in shaping the behavior and characteristics of the theremin’s audio output. Understand their functions and values to ensure proper tuning and operation of the circuit.
Step 3: Assembly Process
Now, let’s proceed with the assembly of your theremin:
- Soldering the Components: Begin by soldering the LM386 chip onto the PCB, ensuring correct orientation and secure connections. Use a soldering iron of appropriate wattage and quality solder to achieve reliable joints without overheating or damaging the components.
- Attaching Passive Components: Solder the capacitors, resistors, and other passive components onto the PCB according to the schematic diagram. Follow best practices for component placement and orientation, minimizing signal interference and maximizing circuit stability.
- Connecting Antennas and Speaker: Affix the metal rods (antennas) and the speaker to their designated positions on the PCB, ensuring proper connections and alignment. Use suitable mounting hardware or adhesives to secure the components in place, preventing mechanical failures or disconnections during operation.
Conclusion: How to Build a Theremin
Building your own theremin offers a blend of technical exploration, creative expression, and musical discovery. Whether you’re a seasoned electronic enthusiast or a curious beginner, the journey of constructing and playing your theremin promises to be a rewarding and enriching experience.
So, gather your components, dive into the world of electronics, and let the ethereal sounds of the theremin guide your musical odyssey.
Frequently Ask Questions
How much does it cost to build a theremin?
Depending on the quality of components and materials, expect to spend approximately $30-$40 USD.
Is building a theremin difficult?
While basic soldering skills are required, building a theremin is an achievable project for enthusiasts of all levels. Beginners may benefit from practicing soldering techniques before starting.
Can I customize my theremin with different components or features?
Yes, feel free to experiment with alternative components, circuit configurations, or additional features to tailor your theremin to your preferences and requirements.
What type of enclosure should I use for my theremin?
You can use any type of enclosure that you like, but we recommend using a project box.
How does the theremin work?
The theremin uses two metal antennas to sense the position of your hands in relation to the instrument. It then produces a sound that is based on the position of your hands.
What type of audio amplifier should I use for my theremin?
We recommend using an LM386 audio amplifier chip.
Can I use a different type of speaker for my theremin?
Yes, you can use any type of speaker that you like. You can also check out 9 Best Passive Speakers for Home Theaters (Tried & Tested)
Can I add effects to my theremin?
Yes, you can add effects such as reverb or echo.
That’s all! for How to Build a Theremin guide. Meanwhile, you can also check out 11 Best Bluetooth Speakers with Subwoofer (Affordable) and 15 Best Powered Bookshelf Speakers (Tried and Tested)


Hi, where do we find the schematic?
Hi,
Thanks for asking. 🙂
We would suggest you check this video tutorial.
https://www.youtube.com/watch?v=t5ivz3KKszk